How to Read an Estimate—Transparent Pricing for Frederick Clients
September 17, 2025
Frederick, MD Painting Rules: What Homeowners & Property Managers Must Know
October 8, 2025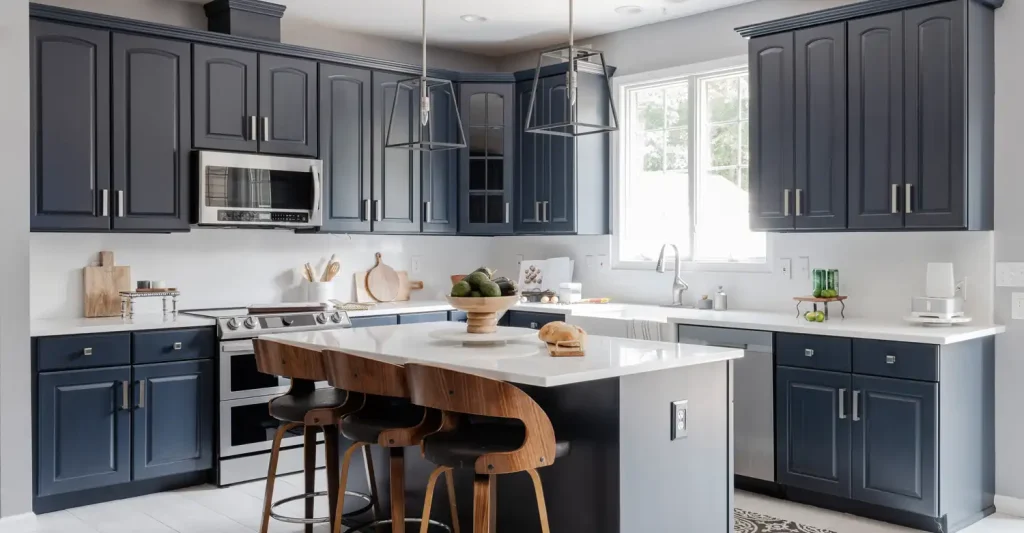
Frederick Painting Company helps you refresh your kitchen with expert cabinet painting and refinishing that increases durability and style while minimizing disruption. You’ll benefit from local experts who use meticulous, proper surface prep and premium coatings for a long-lasting finish, and they prioritize lead paint testing when older cabinetry may pose hazards. You get transparent timelines, tailored color guidance, and workmanship that protects your investment.
Key Takeaways:
- Professional cabinet painting and refinishing specifically for Frederick kitchens, delivering refreshed, high-quality finishes.
- A variety of colors and finishing techniques are available to update the style and enhance cabinet durability.
- Local, experienced team focused on thorough prep, efficient timelines, and minimal disruption to your kitchen.
The Aesthetic Transformation: How Cabinet Painting Transforms Kitchens
The Visual Impact of Freshly Painted Cabinets
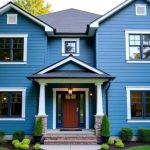
You notice light reflecting off freshly painted surfaces, which can instantly make your kitchen feel larger and cleaner. Painting can update oak or dated finishes without replacing boxes, typically completed in 2–5 days and costing often 60–80% less than full cabinet replacement. You gain crisp lines, renewed hardware contrast, and the flexibility to change moods—bright whites open space, deep blues add drama—while proper prep and topcoat deliver a finish that looks professional and lasts.
Color Trends and Personalization: Choosing the Right Palette
Your palette choice sets the room’s personality: popular options include soft whites for resale, warm greys for neutrality, deep navy or charcoal for islands, and sage or muted green for a modern organic feel. Two-tone schemes—upper cabinets in light tones and islands in darker hues—remain a popular trend. Try three sample swatches in different lighting conditions and select finishes like satin or semi-gloss for durability to balance style and wear.
Balance matters more than following a single trend. Match cabinet undertones to countertops and flooring: pair cool-veined quartz with blues or greys, and warm butcher block or travertine with creams and sage. Apply a 2-coat primer and a 2-coat topcoat system for long-term durability; spray application often yields the smoothest result on recessed panels. Test colors on a full door or 12 “x12” panel and view at morning, noon, and evening to catch undertone shifts. If you plan to sell, stick within neutral ranges—buyers favor whites and greys—but don’t shy from a bold island color to create a memorable focal point that can increase perceived design value.
The Art of Refinishing: Restoring Cabinets to Their Former Glory
Techniques Used in Professional Cabinet Refinishing
Common techniques include chemical stripping, power sanding using 120–220 grit, and removing doors for controlled shop spraying with HVLP guns. Contractors use shellac-based primers to block tannin bleed and waterborne conversion varnishes or two-part urethanes for long-term durability. Expect flash times of 2–4 hours between coats and a full cure in 48–72 hours. If your cabinets were manufactured before 1978, insist on lead testing and containment to prevent exposure to lead dust.
The Benefits of Refinishing over Replacement
Refinishing typically costs 30–70% less than full replacement, often completed in 2–5 days with minimal disruption to your household. You preserve solid-wood doors, reduce landfill waste, and modernize color and hardware while maintaining your kitchen’s layout and resale appeal.
Typical refinishing can extend cabinet life by 10–15 years, and finishing with two-part urethane delivers factory-grade abrasion resistance. You’ll often save thousands—mid-range replacements commonly run $12,000–$30,000, whereas professional refinishing for a 10–12 cabinet kitchen typically costs $3,500–$8,000, depending on prep and finish choices. A Frederick project refinished 24 doors in 3 days, restoring full use quickly and yielding about a 60% savings versus replacement. Select waterborne finishes to reduce VOCs and demand a written warranty, along with clear care instructions, to protect your investment.
Budgeting for a Kitchen Makeover: Costs and Considerations
Understanding the Financial Investment in Cabinet Services
Expect cabinet painting to typically run between $1,000 and $4,000 for an average kitchen, while cabinet refinishing often falls within the $2,000 to $7,000 range, and full replacement ranges widely from $8,000 to $30,000. Your final price depends on cabinet count, door style, surface condition, hardware, and whether you choose spray finishes or hand-brushed lacquer—prep and labor are usually the largest cost drivers.
Cost-Benefit Analysis: Painting vs. Refinishing vs. Replacement
Painting typically delivers the lowest upfront cost and provides 5–10 years of renewed appearance. Refinishing preserves the wood grain and can extend life by 10–15 years, while replacement offers the longest lifespan (20+ years) and allows for design changes, but costs 2–5 times more. Turnaround times matter: painting takes 2–5 days, refinishing takes 3–7 days, and replacement takes 1–3 weeks. Weigh your budget, expected resale value, and how long you plan to stay in the home.
In a 10×10 kitchen with ~20 doors, a common scenario is choosing between painting at $1,800–$3,200, refinishing at $3,500–$6,500, or replacing at $12,000–$20,000. If you plan to sell within 3–5 years, painting often returns ~50–80% of its cost in perceived value and curb appeal; staying longer may justify refinishing for its durability or full replacement for layout changes. Material choices—such as MDF or solid wood, and solvent vs. waterborne finishes—impact scratch resistance and maintenance, so factor in long-term upkeep and warranty costs when making your budget decision.
The Process Unveiled: What to Expect from Frederick Painting Company
Step-by-Step Overview of the Painting and Refinishing Process
You’ll see a clear, repeatable workflow: inspection and measurements, hardware removal, surface prep (sanding, degreasing, minor repairs), primer application, two finish coats applied by spray, then reassembly and final inspection; for a typical 10–12 cabinet kitchen, expect 2–4 days and professional dust control throughout to protect your home.
Step-by-Step Breakdown
| Step | Details / Time |
| Inspection & Quote | Measure, document issues, and confirm colors; typically 1–2 hours. |
| Remove Hardware & Mask | Hinges and knobs removed; floors and appliances masked to control dust; same-day service. |
| Prep & Repairs | Sanding, degreasing, and wood filler for gouges; small repairs add 1–2 hours per cabinet run. |
| Priming | High-build primer applied; 24 hours dry time for waterborne systems, up to 48 hours for solvent primers. |
| Finish Coats | Two spray-applied topcoats (catalyzed urethane or waterborne alkyd); each coat typically 2–4 hours, including flash time. |
| Reassembly & Final Inspection | Hardware has been reinstalled, touch-ups completed, and a walk-through with you, the project manager, has been conducted. The project manager signs off on quality and warranty. |
Timeline: From Start to Finish
Most standard cabinet projects are completed in 3–5 business days: day one for preparation and masking, day two for priming and light sanding, and day three for topcoats and reassembly. Larger kitchens or custom glazes can extend the project to 7–10 days, with daily progress updates to keep you informed about what to expect.
Example: A recent Frederick kitchen with 14 doors and custom glazing was completed in 6 days. Preparation took 8 hours, two coats of primer were applied over 24 hours, and glazing and two topcoats required an additional 48 hours of controlled drying. Factors that lengthen timelines include structural repairs, high humidity (which can add 24–48 hours to dry times), and specialty finishes. You should avoid heavy use for 48–72 hours after the final coat to prevent marring; full cure for continuous wear often reaches 7 days.
Essential Factors for a Successful Project: Quality and Preparation
- Surface Preparation — thorough sanding, deglossing, and grease removal to prevent adhesion failures.
- Cabinet Painting — choose the right application method (brush, spray, roller) for smooth, factory-like results.
- Refinishing — match substrate treatments to wood type; stained cherry needs different sealing than painted MDF.
- Primers & Sealants — use stain-blocking primers on tannin-rich woods and shellac or high‑solids primers for repairs.
- Paint Quality — select 100% acrylic or waterborne alkyds rated for cabinetry for durability and low yellowing.
- Skill & Technique — leveling thin, even coats and sanding between coats (220 grit) yields a durable finish.
- Protection & Cleanup — Mask appliances and use a HEPA vacuum to protect HVAC and indoor air quality.
Importance of Surface Prep in Painting and Refinishing
You start by stripping grease with a TSP substitute, then sand to the appropriate grit—120–150 for bare wood, 220 for smooth primer-to-topcoat adhesion—to avoid peeling and fisheye defects. You should use a solvent wipe or deglosser on glossy finishes and fill gouges with a stain-blocking wood filler. Failure to remove contaminants will shorten the life of your Cabinet Painting and Refinishing work.
Choosing the Right Materials: Paints, Stains, and Sealants
Select high-quality products, such as waterborne alkyd or 100% acrylic cabinet enamel, for kitchens. Pair them with a compatible primer and a durable topcoat, typically semi-gloss or satin polyurethane, for enhanced wipeability. You should consider low-VOC formulations for improved indoor air quality and select stains with good penetration for hardwoods to prevent blotching.
For specific options, you can use Benjamin Moore Advance or Sherwin-Williams Emerald Urethane Trimcoat for a balance of flow and hardness. General Finishes Enduro or High Performance are excellent waterborne choices, often used by professionals. Conversion varnish offers the highest wear resistance in heavy‑use kitchens but has high VOCs and often requires spray application and professional handling. Dry times range from 4 to 12 hours between coats, depending on the product and humidity; plan for a full cure of 48 to 72 hours before light use. After the finish has fully cured, inspect for touch-ups and test the cabinet function before returning the hardware.
Customer Experiences: Testimonials from Happy Clients
Real Stories of Kitchen Transformations
You saw a 1920s Frederick bungalow go from dated oak to modern matte navy after we refinished 28 cabinet doors in 3 days, sealed surfaces with low‑VOC coatings, and kept dust containment below 2% spread; the homeowner paid roughly $2,600 versus a full replacement estimate near $12,000 and called the result “like walking into a brand‑new kitchen.”
The Impact of Quality Work on Homeowners’ Lives
You often gain more than aesthetics: professional refinishing typically costs $900–$6,000 compared with replacement estimates of $8,000–$20,000, cuts renovation downtime to 2–5 days, and frequently reduces stress and disruption for families with kids or pets.
You can expect measurable value—one Urbana project refinished maple cabinets in 4 days, passed a lead test and used low‑odor finishes, and the owners reported a faster sale appraisal and a noticed 15% increase in buyer interest during showings; efficient scheduling and proper prep meant the family regained full kitchen use in under a week.
Sustainability Matters: Eco-Friendly Practices in Cabinet Painting
Green Products and Their Benefits
Choose low- and zero-VOC (<5 g/L) water-based paints and waterborne conversion varnishes to cut indoor air pollution; low-VOC formulas (<50 g/L) typically emit far less off-gassing than solvent-based coatings. Brands like Benjamin Moore Natura, Sherwin-Williams Harmony, and ECOS offer certified options (GREENGUARD, EPA Safer Choice) that reduce odor, cure faster, and lower health risks, such as respiratory irritation, for you and your family.
How Refinishing Promotes Sustainability
Refinishing preserves cabinet carcasses and doors, often diverting 70–90% of cabinet material from landfills and typically saving 30–70% compared to full replacement costs. You keep the embodied energy of existing wood and hardware in your kitchen while achieving a new look with far less waste and fewer new materials.
Practical steps include inspection and targeted repairs, chemical stripping or dustless sanding, sealing with a low-VOC primer, then applying durable waterborne topcoats that resist chipping and moisture. A typical 20–25 door kitchen can produce several hundred pounds of waste if replaced; by refinishing, you can extend cabinet life by 10–15 years, avoid disposal fees, and reduce the carbon footprint associated with manufacturing and shipping new units, all while maintaining custom color and finish options for your space.
Summing up, when you want refreshed cabinets in Frederick kitchens, Frederick Painting Company offers expert cabinet painting and refinishing that preserves your cabinetry while enhancing style and durability. You’ll receive professional color guidance, meticulous surface preparation, and long-lasting finishes, ensuring your kitchen looks updated, functions better, and adds value to your home.
FAQ
Q: What cabinet painting and refinishing services does Frederick Painting Company provide for Frederick kitchens?
A: Frederick Painting Company offers full-service cabinet refinishing, including on-site and off-site spray painting, surface repair, door and drawer removal, hardware replacement or reinstallation, glaze and distressing options, custom color matching, and protective clear coats. We handle full kitchen cabinet sets, islands, built-ins, and trim to transform the look of Frederick homes without a full remodel.
Q: What is your cabinet refinishing process from estimate to completion?
A: We start with a site visit or virtual consultation to assess the condition, measurements, and desired finish. After a written estimate and approved color selection, we remove doors and hardware if off-site refinishing is chosen. We thoroughly clean and degloss surfaces, repair dents and gouges, sand, apply primer, and then apply multiple coats of stain or paint using a factory-grade spray system or hand-applied techniques. Final steps include applying topcoats for durability, reinstalling and reattaching hardware, and a final inspection to ensure a consistent finish throughout the kitchen.
Q: How long will a typical cabinet painting or refinishing project take for a Frederick kitchen?
A: Timelines vary by project size and whether work is done on-site or off-site. Small kitchens often take 3–5 business days on-site; medium kitchens typically take 5–10 business days; off-site refinish jobs can take 7–14 days, including pickup and reinstallation. Complex repairs, custom glazing, or extensive sanding may require an extended schedule. We provide a project timeline with every estimate and coordinate work to minimize disruption to your household.
Q: What factors affect the cost of cabinet painting and refinishing, and how do I get an accurate estimate?
A: Cost depends on scope (number of doors/drawers), condition of cabinetry (repairs needed), chosen finish (paint, stain, glaze), hardware changes, and whether refinement is on-site or off-site. We offer free on-site or virtual estimates, where we measure, inspect, and provide recommendations. Estimates include labor, materials, surface prep, and protective topcoats, so you get a transparent, itemized price tailored to your Frederick kitchen.
Q: How durable is the refinished cabinet surface, and do you provide maintenance guidance or a warranty?
A: We use high-quality primers, paints, and catalytic or urethane topcoats formulated for cabinetry to ensure scratch, moisture, and chemical resistance suitable for busy kitchens. Typical durability lasts for many years with normal use. We provide post-job care instructions, including gentle cleaners, the avoidance of abrasive pads, and prompt spill cleanup. The estimate also includes warranty information that covers workmanship and finish adhesion for a specified period. For older homes, we follow lead-safe work practices as needed.

Shawn Zimmerman started painting in the summer of 1991, the year before he graduated high school. Shawn decided to pursue his career in the family business and continued to develop his skills in the trade while also developing the necessary skills to manage the business. Shawn enjoys being outdoors, canoeing, camping, hiking, hunting, fishing and spending time with family.
