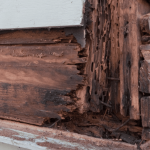
Why Painting Over Rotten Wood in Frederick Homes Leads to Bigger Problems
April 7, 2026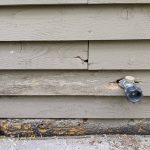
How to Repair Rotten Wood Siding and Get It Ready for Paint
April 21, 2026
Ceiling damage can make a room look neglected in a hurry.
A small crack, stain, sagging section, or soft spot overhead tends to stand out more than the same issue on a wall. Many homeowners notice the damage, look up, and immediately ask the same question: Should this be patched, or does the drywall need to be replaced?
That is where the decision gets important.
Not every damaged ceiling needs full replacement. In many cases, patching the affected area is enough. But in other situations, patching the ceiling only delays a larger repair and can lead to an uneven finish, repeated cracking, or additional labor later.
If you are trying to figure out how to repair drywall ceiling damage, the best starting point is understanding what kind of damage you are dealing with, what caused it, and whether the surrounding area is still solid.
This guide breaks down when patching makes sense, when replacement is the better move, and what should happen before the ceiling is repaired and painted.
Why drywall ceiling damage happen in the first place
Before deciding how to fix the ceiling, it helps to know why it was damaged.
Drywall ceilings can fail for several reasons. Some are minor and localized. Others point to a deeper issue that needs attention before any repair work begins.
Common causes include:
- roof or plumbing leaks
- old water stains from past moisture issues
- settling cracks
- impact damage
- sagging from repeated moisture exposure
- poor taping at seams
- failed fasteners or nail pops
- aging materials
- movement in the structure above
The cause matters because the right repair depends on it.
For example, a small hole caused by impact is very different from a ceiling area that has become soft after water exposure. Both are drywall problems, but they do not call for the same solution.
That is why anyone learning how to repair drywall ceiling damage should avoid jumping straight to patching materials before figuring out what actually happened.
When patching a drywall ceiling, it is usually enough
Patching is often the right choice when the damage is limited and the surrounding drywall is still stable.
This is usually true for cosmetic or contained issues that have not weakened a large section of the ceiling.
Patching may be enough when you have:
- small holes
- minor surface dents
- hairline cracks
- limited seam damage
- one or two nail pops
- a small area of staining after the moisture issue has already been fixed
- a localized damaged section with solid drywall around it
In these situations, the main goal is to remove loose material, secure the area if needed, patch it properly, smooth the surface, and get it ready for primer and paint.
A patch can work very well when the damage has clear boundaries and the surrounding drywall has not lost strength.
That is the part many people overlook.
The damaged spot itself may look small, but if the drywall around it is soft, sagging, or unstable, patching alone may not last.
Signs that patching is probably the right option
Homeowners often want a simple way to judge whether a patch is worth trying.
There are a few signs that usually point in that direction.
The damaged area is small
A contained crack, hole, or stain is more likely to be patchable than a broad damaged section spreading across the ceiling.
The drywall still feels firm
If the ceiling around the problem feels solid and does not flex or crumble, patching may be a good option.
There is no active moisture
If a leak caused the damage, but the leak has been fully fixed, and the drywall has dried properly, the area may be suitable for repair.
The damage is mostly cosmetic
Peeling tape, light cracking, or minor surface flaws often do not require a full tear-out.
The surrounding finish is in decent shape
If the rest of the ceiling is smooth and stable, blending in a patch is often easier and more practical.
In these cases, patching can save time, reduce disruption, and preserve the rest of the ceiling.
When should ceiling drywall be replaced instead
Replacement is the better choice when the drywall has lost strength, moisture damage is widespread, or the damaged section is too large or unstable for a patch to hold well.
This is especially true when the problem runs deeper than the surface.
Replacement may be needed when you see:
- sagging drywall
- soft or crumbling sections
- repeated water damage
- mold concerns after prolonged moisture exposure
- large holes or broken sections
- widespread staining
- tape failure across long seams
- ceiling areas that bow or flex
- multiple damaged spots close together
- recurring cracks that keep returning after repair
At that point, patching may only create a temporary fix.
Instead of repairing one weak area, it is often better to remove the failed section and install new drywall so the ceiling has a stable base again.
Anyone searching for how to repair drywall ceiling damage should know that replacement is not always excessive. Sometimes it is the cleaner, smarter, and more durable option.
The biggest factor: is the drywall still sound?
This is often the deciding point.
A ceiling patch works best when it is attached to sound material. If the drywall around the damaged spot is firm, dry, and well-secured, a patch has something reliable to tie into.
If the surrounding drywall is weak, patching becomes less dependable.
That is why the question is not just, “How bad does it look?”
The better question is, “Is the material still strong enough to support a repair?”
A stained ceiling can still be sound.
A cracked ceiling can still be sound.
But a ceiling that feels soft, sags between joists, or shows signs of ongoing moisture trouble is telling you the issue extends beyond the surface.
When that happens, replacement usually makes more sense than trying to repair a failing area.
How water damage changes the decision
Water damage is one of the most common reasons homeowners need ceiling repair.
It is also one of the biggest reasons patching fails.
If the stain is old, the leak has been repaired, and the drywall remains solid, patching may still work. But if the drywall is swollen, soft, sagging, or weakened, it should not simply be covered and finished.
Water changes the structure of drywall.
The paper facing can loosen. The gypsum core can weaken. Tape joints may separate. The area may begin to bow or crumble. Even if the surface dries, the material may no longer be strong enough to hold a long-lasting repair.
That is why water-damaged ceilings need careful evaluation first.
When learning how to repair drywall ceiling problems caused by leaks, many homeowners focus on hiding the stain. But the more important step is deciding whether the drywall beneath that stain still deserves to stay in place.
Small cracks do not always mean replacement
Not every ceiling crack is a sign of major failure.
Some cracks are minor and can be repaired with patching methods, especially if they are small, stable, and not tied to movement or moisture. These cracks may come from normal settling, slight stress at joints, or age in the taped seams.
In these cases, patching can restore the surface and prepare it for painting.
Still, it is important to watch for warning signs that suggest a larger issue, such as:
- cracks that keep reopening
- cracks paired with sagging
- cracks with staining nearby
- long seam cracks across wide areas
- multiple cracks are forming in the same part of the ceiling
When that happens, patching the visible line alone may not be enough. The underlying cause should be addressed first.
Hole size matters, but it is not the only thing that matters
Many people assume the repair decision is based only on the size of the damaged area.
Size does matter, but it is not the whole story.
A small hole in solid drywall may be simple to patch.
A medium-sized damaged section can also be patched if the surrounding material is stable and the repair is framed properly.
But even a small area may need replacement if the drywall is weak, damp, or crumbling around the edges.
That is why the size of the hole should be judged along with:
- material condition
- cause of damage
- moisture history
- ceiling stability
- nearby seam condition
- how well the repaired area can blend with the rest of the surface
The best repair is not always the one that keeps the most drywall in place. It is the one that leaves the ceiling strong, smooth, and ready for a lasting finish.
What a proper patch repair usually involves
If patching is the right choice, the process should be done carefully.
A rushed patch overhead often leads to uneven texture, visible seams, flashing under paint, or a repair that cracks later.
A solid patch repair usually includes:
1. Identifying and fixing the cause
If the damage resulted from a leak or a movement issue, that should be addressed first.
2. Removing loose or failed material
Damaged drywall, loose tape, peeling compound, or soft areas need to be cut away.
3. Securing the surrounding drywall
Any loose sections should be fastened properly so the repair area is stable.
4. Installing backing or a patch piece if needed
For holes or cut-out areas, the patch needs support to sit flush and secure.
5. Taping and applying joint compound
This builds a smooth transition between the repair and the existing ceiling.
6. Sanding and refining the surface
The goal is to blend the repair so it does not stand out once painted.
7. Priming before painting
Primer helps seal the repair and create a more even final appearance.
This sequence matters because ceiling repairs are especially noticeable when light hits them across the surface.
What full or partial replacement usually involves
When replacement is needed, the damaged ceiling section is removed and rebuilt with new drywall.
That may sound like a larger job, but it can actually lead to a cleaner result when the old material has clearly failed.
A replacement process often includes:
1. Solving the source problem first
Leaks, moisture entry, or structural concerns must be handled before new drywall goes up.
2. Removing damaged drywall
This includes any soft, sagging, broken, or compromised areas.
3. Checking framing or support
Joists or backing should be inspected to make sure the new material will be installed securely.
4. Hanging new drywall
The new panel or section needs correct fastening and alignment.
5. Taping, finishing, and sanding
As with patching, surface finish quality matters greatly on ceilings.
6. Priming and painting
A repaired ceiling needs a finish system that blends the new area with the existing one.
In some cases, replacing a single larger section produces a smoother final look than patching several smaller damaged spots one by one.
Appearance matters more on ceilings than many people expect
Ceilings tend to reveal imperfections easily.
That is because overhead surfaces catch light differently. Seams, ridges, patch edges, sanding marks, and uneven texture often become more visible on a ceiling than on a wall.
This is one reason the patch-versus-replace decision should not be based only on material cost.
Finish quality matters too.
If a ceiling has multiple damaged areas, uneven texture, repeated patch lines, or broad staining, replacing a section may create a more uniform final appearance than trying to save every inch of the old drywall.
When thinking about how to repair drywall ceiling damage, it helps to consider not just what can be fixed, but what will actually look right when the room is fully painted again.
Common mistakes people make when choosing between patching and replacement
There are several mistakes that often lead to disappointing results.
Covering stains without checking the material
A stain does not always mean the drywall is ruined, but it should never be ignored without inspection.
Patching before fixing the leak
No ceiling repair lasts long if water is still getting in.
Keeping weak drywall just to avoid replacement
Saving damaged material often leads to more labor later.
Repairing only the visible crack
If the problem is caused by movement or seam failure, the surface line is not the whole issue.
Skipping primer
Even a smooth repair can stand out badly after paint if the patched area is not primed first.
Trying to patch multiple failing spots separately
At some point, section replacement creates a better surface and a cleaner finish.
Avoiding these mistakes can make the difference between a repair that blends well and one that continues drawing attention every time you enter the room.
So how do you know which option is better?
A simple way to think about it is this:
Choose patching when the damage is limited, the drywall is firm, the cause has been fixed, and the repair area can be blended smoothly.
Choose replacement when the drywall is soft, sagging, repeatedly damaged, widely stained, or failing in several connected areas.
That does not mean every damaged ceiling needs to be torn out.
It means the repair method should match the material’s condition.
A patch is not better just because it is smaller.
A replacement is not better just because it is new.
The better option is the one that provides a stable surface for the ceiling and a finish that holds up.
Why should the cause of the damage always be addressed first
This step deserves extra attention.
Many people focus on materials, patching compound, sanding, or painting. But none of that matters much if the original issue has not been corrected.
If the ceiling was damaged by a roof leak, plumbing leak, condensation problem, or repeated movement, that cause must be handled first.
Otherwise, even a well-done repair may fail again.
That is especially true for water-damaged ceilings. You can patch, finish, and repaint the area, but if moisture returns, the damage will return as well.
Before deciding exactly how to repair drywall in ceiling areas, make sure you know why the damage occurred and whether the issue is fully resolved.
Knowing when to patch versus replace is one of the most important parts of ceiling repair.
If the drywall damage is small, localized, and surrounded by solid material, patching is often enough. It can restore the surface, prepare it for paint, and avoid unnecessary removal of good drywall.
But if the ceiling is soft, sagging, repeatedly stained, or damaged across a larger area, replacement is often the smarter route. In those situations, trying to patch may only create more work and a less reliable result.
The key is not choosing the smallest repair.
The key is choosing the right repair.
If you are trying to understand how to repair drywall ceiling damage, start by checking the condition of the drywall, the size of the affected area, and the cause behind the problem. Once those pieces are clear, the choice between patching and replacement becomes much easier.
A good ceiling repair should do more than cover damage.
It should leave you with a surface that is sound, smooth, and ready for a finish that lasts.
FAQs
1. Can all drywall ceiling holes be patched?
No. Small and moderate holes can often be patched, but large holes or those surrounded by weak drywall may require partial replacement.
2. How do I know if water-damaged ceiling drywall needs replacing?
If the drywall is soft, sagging, crumbling, or still unstable after drying, replacement is usually the better option. If it is dry and solid after the source is fixed, patching may work.
3. Is it better to patch a ceiling crack or replace the drywall?
It depends on the cause. Minor stable cracks can often be patched. Repeated cracks, long seam failures, or sagging cracks may indicate a deeper issue that warrants broader repair or replacement.
4. Can I paint over a patched drywall ceiling right away?
Not usually. The patch should be fully dry, sanded smooth, and primed before painting so the finish looks even.
5. What is the most important step before repairing ceiling drywall?
Fixing the cause of the damage is the most important step. If the original problem is not solved, the repair may fail again.

Shawn Zimmerman started painting in the summer of 1991, the year before he graduated high school. Shawn decided to pursue his career in the family business and continued to develop his skills in the trade while also developing the necessary skills to manage the business. Shawn enjoys being outdoors, canoeing, camping, hiking, hunting, fishing and spending time with family.


